Friday 30 September 2011

Necessary Reading - Short & Sweet


Alright I admit it, my cookbook collection is big and looking at it you'd have thought there's no way I needed any more. However, it's books like the fantastic Short & Sweet by Dan Lepard that helpfully illustrate that it will never be too big. This book is brilllllllllllllliant, choc full of wonderful recipes. Practically everything the home baker needs is covered, be it savoury, sweet, traditional or exotic. The illustrations are clear, unpretentious and enticing, exactly like the recipes themselves and there is wealth of helpful tips and techniques included. What I really love about this book is all the extra information accompanying the recipes, which show the author not only knows his stuff, but really cares about each and every recipe. Considering there are more than 280 of them included in this bumper tome, that's no mean feat. So, even if you're convinced you have no more room in your bookcase find a space to cram this one in. I promise you will not regret it!

Wednesday 28 September 2011

Pistachio and Almond Tart with Orange and Cardamom

I got this recipe out of the wonderful Casa Moro Cookbook by Sam and Sam Clark. The Moro cookbooks are exotic yet unpretentious and I can't recommend them highly enough.

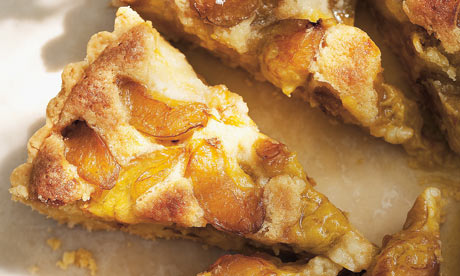
This tart is beautifully fragrant and aromatic, perfect for these warm days of late summer. You can make the tart case well in advance and if you struggle to find blanched pistachios you can substitute with the shelled, unsalted kind. Also if you don't have a food processor you can grind everything by hand, although you'll be there quite some time!

Prep Time: 20 Mins (Not including chilling/freezing time!)
Baking Time: 60 Mins
For the pastry case
225g Plain Flour
1/2Tsp Fine Salt
50g Caster Sugar
12 Green Cardamom pods (Just the black seeds, ground finely)
250g Unsalted Butter
1 Egg Yolk

For the filling
200g Blanched Almonds
300g Blanched Pistachios
250g Caster Sugar
15 Green Cardamom pods (Just the black seeds, ground finely to about 1/4Tsp)
150ml Orange Juice
4 Egg Yolks
Zest of 1 Medium Orange

For the glaze
1 Egg Yolk
2Tbsp Milk or Cream

To make the pastry case, combine the flour, salt, sugar and ground cardamom in a food processor with the butter. Pulse it together until only small lumps of butter remain. Add in the yolk, then process for a further 20 seconds. Turn it out into a bowl then finish bringing it together by hand. Press the dough out until about 2cm think, wrap in cling film and refrigerate for at least half an hour. Roll out the dough on a cool, lightly floured surface, until about 5mm thick and use to line a 24cm tart tin (Don't worry if it cracks a bit). Prick the base and freeze, which can be done well in advance.

Preheat the oven to 180C/350F/Gas 4. Take the tart case out of the freezer, line with baking parchment, fill with baking beans and bake for 20mins (Until the pastry has set). Remove the beans and parchment then return to the oven until the pastry has an even light golden colour. Whilst it is cooling you can start on the filling. In a food processor combine the nuts, sugar and cardamom, then grind as fine as possible. You'll find the nuts start to release their oil and go a bit cakey, which is what you want. Slowly add the orange juice until you are left with a smooth paste. Let the paste cool for a few minutes as all that processing will cause it to warm somewhat, then add the yolks and zest and process again until incorporated.

Spread the filling into the pastry shell and smooth over the top (Using a wet spatula will help). Do this carefully, as to not damage the pastry. Bake in the oven (Same temperature as before) for about 15 minutes, just to dry the top. Then brush on the glaze (Just mix the egg yolk and milk/cream together) and bake for 10 minutes more until golden. Yum yum yum!

Sunday 25 September 2011

Lemon Cake

There are looooaaadddss of good lemon cake recipes out there and there isn't one in particular I favour. However, at the moment I quite like this one as despite being lovely and lemony it still retains that nice deep sponge cake flavour.

Prep time: 20 Mins
Baking time: 45 Mins
200g Butter (Softened)
200g Caster Sugar
225g Self Raising Flour
3 Large Eggs
1Tsp Baking Powder
5 Medium Unwaxed Lemons
50g Caster Sugar (For syrup)

Preheat the oven to 180C/350F/Gas 4 and grease/line a 20cm loose-bottomed cake tin. Cream together the butter and sugar then beat in the eggs, one at a time. Add the zest of three of the lemons, followed by the juice of two (But keep the third as you'll need the juice from that one later!), then sift in the baking powder and flour. Mix it all together then spoon it into the tin. Place in the centre of the oven for about 45 minutes, or until a skewer comes out clean.
When cooked remove the cake from the oven. Zest two lemons into a small saucepan, then squeeze their juice into a measuring jug. Follow that with the juice of that third lemon you have left, then top it up with cold water until you have 100ml of liquid. Pour that into the saucepan, add the 50g of caster sugar and bring the whole lot up to a boil. Reduce the heat to a fast simmer and leave it for a few minutes, then when it starts to thicken remove from the heat. With a metal skewer make holes in the top of the cake (Not all the way to the bottom), then pour over the hot syrup. Let the cake cool in the tin, then remove it and devour at will. 

Saturday 24 September 2011

Undergrowth Design

I heart Undergrowth Design. Their products are elegant yet contemporary and evoke a real sense of wonder. I demand that you check out their site immediately!


Tina Tsang graduated from Central Saint Martins in 2005 in illustration and animation.

Her diverse background that includes film, painting, animation,photography, costume design, fashion design and trend forecasting has enabled her to have a broad understanding of aesthetics and trends within the design world. She uses an interdisciplinary approach to designing and feels that her experience in many design disciplines helps enrich the quality and depth of her work.

She enjoys making products that interact with the user on an emotional level making objects of desire of an heirloom quality that we can keep and treasure. She works with both catering and retail clients both in UK and internationally. We are happy to take on bespoke projects for companies and individuals.

All our products are handmade in London, England.

Thursday 22 September 2011

Monday 19 September 2011

Shortbread

There are lots of shortbread recipes out there, using various ingredients. This one is by far the easiest and the end result is delicious. Basically it's one part sugar, two parts butter and three parts plain flour. Literally as easy as 1-2-3!

Prep time: 10 Mins (Plus a bit of chilling time)
Baking time: 15 Mins
100g Caster Sugar (Plus a little extra for dusting)
200g Unsalted Butter (Chilled and cut into small cubes)
300g Plain Flour (Plus a little extra to flour the surface)

In a large bowl rub the flour into the butter until it resembles breadcrumbs, then add in the sugar. Mix it all by hand until you get a smooth dough. Don't fret if it doesn't come together straight away, it just needs a bit of elbow grease! Once you're happy with it wrap it in cling film, then place in the fridge for 30 minutes.
Preheat the oven to 170C/325F/Gas 3 and line a large tray with baking paper. Take the dough out of the fridge and on a lightly floured surface roll out until just under a centimeter thick. Cut them out in whatever shape you want, as long as they aren't too big. Place them on the tray, leaving a gap between each one as they'll spread a little but when cooking, then bake for about 15 minutes. You'll want them to still be pale so don't let them brown, then take them out and let them cool on the tray. After about half an hour of cooling I dusted them with the caster sugar, but you can leave it a bit longer if you want. I'm just impatient!

Friday 16 September 2011

Necessary Reading – Leon: Baking and Puddings


I’ve been waiting for this book for weeks and now it has arrived, wow it does not disappoint. As expected it’s beautifully presented and sumptuously illustrated. Tools, techniques, ingredients and of course recipes are all comprehensively covered. The explanations are detailed but easy to follow and it’s full of wonderful little touches such as conversion charts and ‘first aid’ (What to do when it all goes wrong). The recipes themselves range from everyday savoury staples to elaborate sweet celebration treats and include practically everything the home baker could ever wish for. Be it cakes, breads, jams, even ice cream, you’ll find it here.

However, by far my favourite part of this book is the small personal touches dotted throughout. Stories, experiences and tributes are all lovingly shared and you get a real sense that the authors are not just experts in the subject matter, but have a love for all that accompanies it.

This may not be the only baking book you’ll ever need, but if you had to buy just one you’d be hard pressed to top this. It’s a really, really brilliant book.

Wednesday 14 September 2011

Gingerbread

I got this gingerbread recipe from the brilliant Peyton and Byrne British Baking book. It's a great one to do with children and you can make the biscuits whatever shape you want!

Prep Time: 15 Mins
Baking Time: 10 Mins
350g Plain Flour (Plus extra for rolling it out)
1Tbsp Ground Ginger
1Tsp Bicarbonate of Soda
100g Cold Unsalted Butter (Cubed)
150g Light Soft Brown Sugar
1 Egg (Beaten)
4Tbsp Golden Syrup

Preheat the oven to 180C/350F/Gas 4 and line a tray with baking paper. Sift the flour, ginger and bicarb into a bowl. Rub in the butter until the mixture gets a sandy texture, then stir in the sugar with a wooden spoon. Whisk together the egg and the golden syrup then add. Mix it well until you get a smooth dough.
Roll the dough out on a floured surface, about 3mm thick then cut out your shapes (Men, Barnyard Animals, Stars, Circles, whatever you like). Put them on the tray, evenly spaced out, then if you like use a sharp knife to etch any detailing into the biscuits. Bake them for about 10 minutes or until they've turned golden brown. Let them cool for 5 minutes of so on the tray then transfer them to a wire rack to cool completely.

These will store in an airtight container for about a week, although they'll probably be all snaffled up sooner than that!

Thursday 8 September 2011

Carrot and Orange Cake

Here's a carrot cake recipe I stumbled upon ages ago. I'm not going to say it's 'the definitive' or 'the ultimate' carrot cake recipe, but it's darn tasty nonetheless. I think the orange works really well and I've done a glaze instead of the traditional cream cheese icing, so this one is dairy free!

Prep Time: 20 Mins
Baking Time: 60 Mins
250ml Sunflower Oil (Plus a little extra for greasing)
225g Light Muscovado Sugar
225g Self Raising Flour
3 Large Eggs
250g Carrots (Peeled and grated)
1 Whole Orange
100g Raisins (The bigger and plumper the better!)
100g Chopped Walnuts
1tsp Baking Powder
2tsp Mixed Spice
75g Icing Sugar (For the glaze)

Preheat the oven to 180C/350F/Gas 4 and grease/line a 23cm springform tin. Put the sugar in a large bowl, pour in the oil followed by the eggs and mix it all together. Add the zest from the orange (keeping the juice for later), then the mixed spice. Sift in the flour and baking powder, then mix it up until you get a smooth batter. Fold in the grated carrot, followed by the chopped walnuts and raisins. It's good at this stage to get your hooter in there and give it a sniff as it'll smell delicious already! Spoon the batter into the tin and bake in the centre of the oven for about 60 minutes, or until a skewer comes out clean. When you're happy it's done take it out the oven, leave for about 20 Minutes then remove from the tin and cool completely on a wire rack.

To make the glaze sift the icing sugar into a bowl and squeeze in that juice from the orange you used earlier. Mix it together, ideally with one of those mini sauce whisk things, until smooth and glossy. You can brush it over the cool cake, drizzle it, or even just spoon it over if you want. The choice is yours!

Monday 5 September 2011

Biscotti

These biscotti are delicious with a cappuccino, latte, or even a cup of tea! Biscotti means 'twice-cooked', so as you'd expect you have to bake these twice. The first time browns them, then the second time dries them out to give them the traditional texture.
Biscotti are traditionally made with ground almonds, but the recipe I've used here is nut free. It really is a ridiculously easy one not to mention delicious, so nut allergy or not fill your boots!

Prep time: 20 Mins
Baking Time: 60 Mins (ish)
250g Plain Flour
250g Caster Sugar
1/2 Tbsp Baking Powder
2 Large Eggs (Beaten)
1 Tsp Vanilla Extract
300g Dark Chocolate Chips

Before we start I just want to mention that although I'm using chocolate chips you can substitute with whatever you like really. If you want to replace half the chocolate with nuts that's fine, or even something like dried fruit is great too.
Anyway, preheat the oven to 180C/350F/Gas 4 and line a large baking tray with baking paper. Put the flour, sugar and baking powder in a bowl, make a well in the middle and add the eggs and vanilla. Start it off with a wooden spoon, add in the chocolate chips, then get your hands in there and mix it into a dough. Dust your hands with a little flour then divide the mix into two. Roll into two sausages, about 3cm in diameter and place on the tray. Leave a large gap between them as they will spread out whilst cooking and stick them in the oven. After about 25-30 minutes or until lightly brown take them out and leave them to cool for about 15 minutes, which will help them firm up. At the same time turn the oven down to 140C/2755/Gas 1. Using a serrated knife slice the biscotti on an angle, about a 1cm thick then lay them back down on the tray (You should get about 30 out of the mix). Put them back in the oven, then after 12 minutes take them out and turn them over. Put them back in for another 12 minutes then remove and leave to cool. Bosh, you're done!

Friday 2 September 2011

Cinemagraphs

Not quite a photo, not quite a movie. Still I think I now love these a little bit...


Thursday 1 September 2011

Chocolate Orange and Almond Cake

This one is based on a Yotam Ottolenghi recipe I found online somewhere. Drizzling the syrup over the sponge prior to icing gives the cake a lovely heady flavour as well as a rich moistness. I think it has a real wow factor and is great for a party.

Prep Time: 30 Mins
Baking Time: 60 Mins
200g Unsalted Butter (Softened)
300g Caster Sugar
Zest of 2 Large Oranges
5 Medium Eggs (Beaten)
200g Ground Almonds
80g Cocoa Powder
100g Plain Flour
Pinch of Salt

For Orange Syrup
Juice of 2 Large Oranges
50g Caster Sugar

For Chocolate Icing
90g Unsalted Butter
150g Dark Chocolate
1/2Tbsp Golden Syrup
1/2 Tbsp Grand Marnier

Right, preheat the oven to 170C/325F/Gas 3 then grease/line base of a 23cm springform tin. Beat together the butter and the sugar, then mix in the eggs a little at a time. Add the zest, followed by the almonds, then sift in the flour cocoa and salt (All together). Mix it all up then pour into the tin. Whack it in the oven for about an hour, until a skewer comes out a little moist. Leave in the tin for about 15 minutes then get started on the syrup.

Put the juice and sugar into a pan on a medium heat and bring to the boil. Once boiling turn the heat off and stir gently to ensure the sugar is properly dissolved. Remove the cake from tin (I do this at this stage otherwise it could stick to the tin once the syrup has dried) and place of a wire rack. Brush the syrup liberally over the cake (You may not use all of it, but be generous!) then leave to cool completely.

Once the cake is cool, you can make the icing. Over a bain-marie melt the butter and chocolate. Once melted remove from the heat, then add the syrup followed by the Grand Marnier. Stir it all together until smooth and glossy. Pour the icing over the cake slowly then work towards the edges lightly with a palette knife or the back of a large metal spoon. You'll find it will dribble over the edges of the cake, which I think gives the cake real character. If you're feeling poncey garnish with a little orange zest, although it's not essential!